
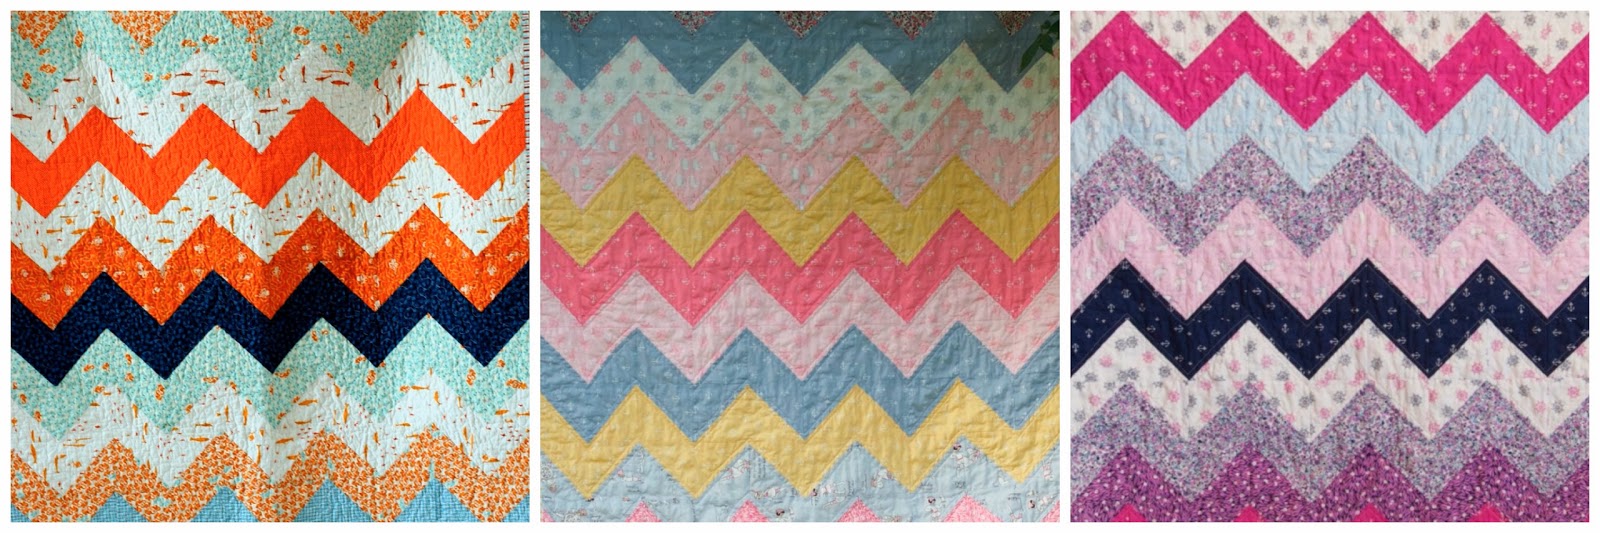
Your kit should include 120 five inch square blocks, backing fabric, and binding fabric. I have now produced 5 different zigzag kits, one of the above images. Each quilt combines different fabrics, but the method is same for all!
This quilt is made up entirely of half square triangle blocks, arranged into a zigzag pattern.
EAch 5 inch square will be paired up with another 5 inch square...the pair will become 2 identical half square triangles. Each row is made up of 5 pairs, which will become 10 half square triangles. You will have 12 rows.
Check your kit to be sure you have all the squares, once you have them all, separate them into pairs: Amounts and pairs are listed below. Again, you will need 5 pairs for each fabric combo.
Country life zigzag

Wee wander zigzag

Out to sea zigzag II


Mendocino zigzag

EAch 5 inch square will be paired up with another 5 inch square...the pair will become 2 identical half square triangles. Each row is made up of 5 pairs, which will become 10 half square triangles. You will have 12 rows.
Check your kit to be sure you have all the squares, once you have them all, separate them into pairs: Amounts and pairs are listed below. Again, you will need 5 pairs for each fabric combo.
Country life zigzag
Wee wander zigzag
Mendocino zigzag
Instructions for ALL kits (regardless of fabric) are as follows...
take your first pair:

place right sides together
using a pencil (or fabric pen), draw a line from one corner to the opposite corner.
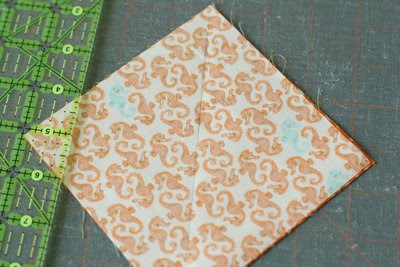 stitch 1/4 inch away on each side of the pencil line. (I use a 1/4 inch foot, if you don't have one, draw a line 1/4 inch from pencil line on either side, and stitch on both lines.)

repeat on other side of pencil line
Your pencil line should now be sandwiched between two stitched lines, 1/4 in away on each side.
using scissors or rotary cutter, cut along pencil line.
you should be left with 2 pieces
press seams toward darker fabric
you now have 2 half square triangle blocks! Repeat this process until all your blocks are complete (120 total). I like to trim my blocks to 4.5 inches, but if you feel confident that they are square, trimming isn't necessary.

As you complete your blocks, you can start lying them out to make a zigzag.
once you have all your blocks (10x12) laid out in order (follow the list of pairs above), begin assembling the quilt top.
Using quarter inch seams, first sew each block in a row together, forming a long strip.
you will have 12 strips with of 10 half square triangles.
Next sew the long strips together until your quilt top is complete.

Now you are ready to "quilt" your quilt. :). There are several options, take it to a local quilt shop and have them quilt it for you, or you can do it yourself.
if you choose to quilt your quilt yourself, see my stripes baby quilt kit instructions for tips on basting your quilt and quilting your quilt.
To bind your quilt, go here.
finished quilt measures approximately: 40in X 48in.
questions? email me nettiepete at gmail dot com
take your first pair:

place right sides together

using a pencil (or fabric pen), draw a line from one corner to the opposite corner.

 stitch 1/4 inch away on each side of the pencil line. (I use a 1/4 inch foot, if you don't have one, draw a line 1/4 inch from pencil line on either side, and stitch on both lines.)

repeat on other side of pencil line

Your pencil line should now be sandwiched between two stitched lines, 1/4 in away on each side.

using scissors or rotary cutter, cut along pencil line.

you should be left with 2 pieces

press seams toward darker fabric

you now have 2 half square triangle blocks! Repeat this process until all your blocks are complete (120 total). I like to trim my blocks to 4.5 inches, but if you feel confident that they are square, trimming isn't necessary.

As you complete your blocks, you can start lying them out to make a zigzag.

once you have all your blocks (10x12) laid out in order (follow the list of pairs above), begin assembling the quilt top.
Using quarter inch seams, first sew each block in a row together, forming a long strip.
you will have 12 strips with of 10 half square triangles.
Next sew the long strips together until your quilt top is complete.

Now you are ready to "quilt" your quilt. :). There are several options, take it to a local quilt shop and have them quilt it for you, or you can do it yourself.
if you choose to quilt your quilt yourself, see my stripes baby quilt kit instructions for tips on basting your quilt and quilting your quilt.
To bind your quilt, go here.
finished quilt measures approximately: 40in X 48in.
questions? email me nettiepete at gmail dot com
So simple, yet so effective! You've put together a fantastic tutorial. It's almost certainly idiot-proof, which is excellent for someone like me...
ReplyDeletegreat tutorial, nettie. I have yet to make a zig zag quilt, but I hope to soon. yours is so cute.
ReplyDeleteWOW! I love the colors!! I was in the process of making on be like this just with three stripes, but maybe I need more! looks great.
ReplyDeleteTHank you so much for writing this. It's perfect.
ReplyDeleteWhat a great tutorial! I immediately started cutting squares so I could make one! So far it's looking great! Thanks for the instructions and for inspiring me.
ReplyDeleteWhat a great tutorial! I now want to go and start one!!! Thanks for the inspiration.
ReplyDeleteBrilliant! I've scheduled links to this post and your Etsy shop to go live on my blog this morning (Central USA time). I hope it brings you a few extra clicks!
ReplyDeleteDenise
http://needlwork.craftgossip.com
I have always loved a zig zag quilt! This one is gorgeous. I may have to make it, like right now.
ReplyDeleteThis is such a gorgeous quilt that I HAVE to make one right now! Great fabric combinations and even better tutorial.
ReplyDeleteThank you, thank you, THANK YOU!!!!
ReplyDeleteYou have no idea.....I have spent all day looking on line for a quilt pattern to try for my 1st quilt!! Your tutorial is so inviting and your quilt is ever so sweet and stylish. YEAH!! I can hardly wait for my Heather Ross fabric to arrive at my doorstep so that I can start sewing. Actually...It will have to to happen during my 10 month old daughters nap times =0)
Nettie loving your blog! You construct the most gorgeous quilts.
ReplyDeleteRosina
(randrew - Etsy)
I am very excited to start making this quilt (my 1st one ever!). Thank you for the clearly and beautifully illustrated tutorial. I am just wondering if the 5x5 blocks include seam allowance or do I need to add fabric onto the measurement when cutting my own blocks? Thanks!
ReplyDeleteHeather
hi heather, they do include the seam allowance! good luck!
ReplyDeleteHi again, Nettie. I just love your blog. You are such an inspiration! I have started to cut blocks for your zig zag quilt and I was wondering what size backing I should cut? Thanks so much!! PS I'll send you a photo when I finish it.
ReplyDeleteHeather
I hope you don't mind, I blogged about this quilt tutorial on my clog, tigerlilytinkering.blogspot.com. I'm thinking about making one as a birthing quilt. Love how it looks!
ReplyDeleteThank you for the tutorial. I love this quilt, and have started making one of my own, inspired by yours. I have blogged about it here (http://quilt-it.blogspot.com/2008/11/falling-in-love-twice.html), and linked to your post.
ReplyDeleteI finished the zig zag quilt (my very 1st quilt) and I love it!!! Thank you so much for posting such a clearly written and un-intimidating tutorial. I really appreciate it! I would like to email you a photo of it. How should I do that?
ReplyDeleteThanks,
Heather
heather i am so happy for you...my email is: nettiepete at gmail dot com
ReplyDeletei'd love to see your quilt.
Thank you so much for this tutorial. I was a bit afraid to work with triangles until I found this! Come check out my progress over the next month!
ReplyDeleteHi: I just found your blog and love your quilts. The tutorials are wonderful; wish I had known the secret for cutting diagonal pieces before I made mother's quilt last year. My pieces were all wonky and I couldn't square them up. I'll definitely try the zig zag quilt some time in the future now that I know this technique of sewing on the diagonal before cutting.
ReplyDeleteThanks so much. Keep up the inspiration.
jam
i just wanted to THANK YOU and let you know i linked to this tutorial on my blog post today. it was a huge help to me and to my holiday gifts. thank you and merry christmas!
ReplyDeleteI just found your blog and love your quilts. Great inspiration! I am going to follow your blog to make sure I am not missing out on more great quilts.
ReplyDeleteI'm loving this! Just found your site. What is the finished size of this quilt?
ReplyDeletehi Kandra,
ReplyDeletefinished quilt measures approximately 40x48in.
nettie
After much debate, I think I'm going to be making a zig zag quilt for my 4 year old's bed. This is the perfect tutorial. I really appreciate all the pictures.
ReplyDelete-Diane
This is a wonderful tutorial. Thank you very much for taking time to provide it for us!
ReplyDeleteLove the tutorial! Don't know why but I always have problems with the small HST's especially. Great quilt for charity quilts, too! Especially boys! I love to do boy's quilts! Thank you for sharing!
ReplyDeleteThanks for sharing the pattern! Love the way the colors move! Looking forward to the Rss feeds to your blog so I can see your creativity flourish. . . amy
ReplyDeleteI really like the zigzag quilt. Maybe some day I will make one like that. It looks so nice. Thank you so much for sharing it. Have a great day. Blessings.-me-(Mommy of two little blessings)
ReplyDeleteI just finished making a version of this for my 2nd quilt top. It's so cute--check it out. What do you think??
ReplyDeleteThis is really great! Almost reminds me of moms crocheted afghans.
ReplyDeleteGood tutorial, well and clearly written, well photographed exactly what I would want for learning. Thanks for taking the time to make it and sharing it with the blogworld.
ReplyDeleteHey, I have been wanting to make this quilt forever, but havn't been able to find the pattern, you made it so easy! and I can't wait to get started, but I was hoping that maybe you could tell me the yardage you need, bc I have some vintage fabrics here (from my dad) that i have been dying to use, I just want to make sure its enough before i start cutting it up. Thanks a bunch!!
ReplyDeleteWhat a darling quilt. I love it. thanks for the tutorial too!
ReplyDeleteThanks for a great tutorial. I have been wanting to make this for quite awhile, but hadn't seen instructions that were great. Yours are!! Can't wait to begin!
ReplyDeletewow! i'm just checking out your blog again and found this incredible useful tutorial. your blog inspires me so much these days that i'm in a total quilting mood though i only did ONE yet and it drove me a bit nuts :-) but i promised to myself to do one quilt a year. and the next will be definitely zig-zag style. thank you so much!!
ReplyDeleteHi - I'm new to all this and can't wait to get started - your blog is really inspiring - but I'm wondering how you achieve the 'puckered' effect with your quilting? I've bought heirloom batting with a degree of shrinkage to it, but to what extent do you have to quilt all over the surface? I'm guessing just quilting the zig zags would not be enough?
ReplyDeletei LOVE this zig-zag quilt. i have been wanting to make my first quilt lately and i think i will have to get started now that i found the PERFECT pattern. thank you, thank you!! i can't wait...
ReplyDeleteoh wow! I love it! but for my first quilt to make, it's a little bit too much, right? right? ;)
ReplyDeleteI have just finished! It was my first quilt and took me two months of evenings and weekends. Am hooked! Love it!
ReplyDeletevery beautiful and very nice helpful article i really took time to looking for how to learn this you are great thanks
ReplyDeleteI am beyond excited to try this!
ReplyDeleteOhhh this is orange and it is sew my new happy color...great quilt sweetie...saw you over at Trudi's....new follower me = you lol
ReplyDeleteGorgeous quilt! I recently made a diamond quilt and really struggled with the angles. I now see that it is because I didn't take the time to draw out the lines and match up appropriately.
ReplyDeletehttp://itssewforyou.blogspot.com/2011/02/argyle-quilt.html
Thanks for the tutorial. I just finished a baby quilt and it turned out really well. Great instructions!
ReplyDeleteO my gosh I wish I had this fabric kit - so cute!!!
ReplyDeleteThanks for the simplified directions for this cute quilt.Sometimes things look complicated and then oops someone like you explains to so easily.
ReplyDeleteThank you for sharing :-)
Terry R
This comment has been removed by the author.
ReplyDeleteThank you so much for the tutorial - your quilt is amazing.
ReplyDeleteI've only finished the top (I made it into a queen size here http://myscrappystuff.blogspot.com/2011/09/my-queen.html ) but I love how it's going xxx
Apparently, I am waaaaaaaaay late to the party. I just found your blog last night and I can't stay away. I am going to make this pattern with some charm squares that I need to clear out of my stash!
ReplyDeleteWhat size quilt will this pattern make? Twin?
ReplyDeleteHi,
ReplyDeleteMay I know the fabric's name? thank you!
This comment has been removed by a blog administrator.
ReplyDeleteI enjoyed reading it. I require to study more on this topic. Thanks for sharing a nice info..Any way I'm going to subscribe for your feed and I hope you post again soon.
ReplyDeleteThank you so much for this tutorial. It's so easy to follow that even I will be willing to attempt it :)
ReplyDeleteu're so creative. simple but nice..
ReplyDeleteMaking this quilt for my grand daughter due this April. Thank you for your easy to follow instructions!
ReplyDeleteYou don't mention trimming the blocks after cutting them in half. Are you trimming them? to 4 1/2"?
ReplyDeleteGreat tutorial! Fabulous quilt!
ReplyDeleteGreat.. I Love it Thanks
ReplyDeleteGracias del pasoa paso..!!
ReplyDeleteEstoy intentando hacer un camino de mesa..!!
Puedes visitarme a:http://www.marcelasusanatoledonespral.eu/
ReplyDeleteI have always loved a zig zag quilt! This one is gorgeous. I may have to make it, like right now.
وظائف للجميع
السيو
كلمه مفتاحيه